• ABOUT
  • PRIVACY POLICY
  • TERMS AND CONDITIONS
  • CONTACT US

Handyman Sydney

Home Improvement, Home Repair And Home Renovation

How To Wall Hanging Anything Guide

February 12, 2014 by Billy Soler

How To Wall Hanging Anything Guide
handyman services sydney cbd
Photo: startlocal.com.au

There are about as many gadgets to help you hang things on walls, as there are walls and things to be hung. What you use and where depends on the construction of the wall and the weight the hanger must support. For example, there are many self-stick hangers that have an adhesive backing that you press onto a clean sealed surface. They are handy for putting up pictures and other lightweight items but are not designed to support very heavy weights.

When hanging things like curtain rods on masonry walls, first insert a plastic wall anchor. The anchors are made for different sized screws so buy a pack of the size to suit your screws. The pack tells you what size bit to use when drilling a hole to take the anchor. Drill the appropriate sized hole and insert the plastic anchor, tapping it all the way in. Next, insert the screw through the item it is to hold and screw it into the anchor. As you screw the resistance you feel tells you the screw is expanding the anchor so it grips the sides of the hole. If you must plug a wall and have no anchor handy, whittle a scrap of doweling to a slight point at one end and hammer it into the hole then insert the screw into the wood. Putting some PVA glue into the hole first before inserting the wooden plug will make it even more secure.

Hanging pictures.

A number of hangers are available to support pictures on different types of walls. Generally, a single picture should be hung so its centre is at an average eye-level to a persons standing in the centre of the room. Using 2 hangers will help keep pictures straight. ­The screw eyes for the picture wire should be placed about a quarter the way down from the top of the frame and the picture should pull downwards, not outwards, on the hanger. For concrete and brick walls, one of the best picture hangers is a plastic hook, which has 3 or 4 thin headless pins projecting from it. The hook is placed flat side to the wall and all four pins hammered in at one time.

For smooth, flat surfaces such as tiles, glass, wood, etc. a self-adhesive hanger is suitable. Ensure the surface is absolutely clean, dry and well sealed then peel off the backing paper protecting the adhesive and press the hook into position. Do not touch the adhesive patch or try to move the hook once positioned as this weakens its gripping power. Leave to set for the time recommended on the pack before hanging anything from the hook.

Angle drive hooks are used for a number of solid wall surfaces. The hook has a hardened pin driven through it at an angle. Simply place the hanger flat against the wall, insert the nail through it and drive in with hammer. In hard wood or tough lathe it is helpful to drill a small pilot hole first. To protect the surface, first make an X with two strips of sticky tape where the nail is to enter the wall. This will prevent any surface finish being damaged.

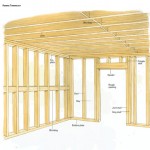
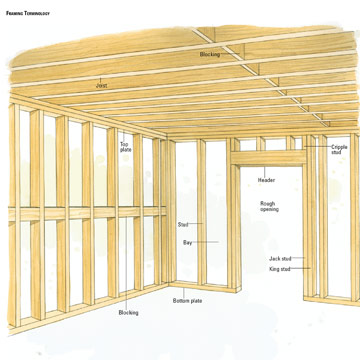
Hollow walls such as fibro are a problem when you want to hang something. If possible, hangers should be driven into the timber studs behind the walls. Locate these by tapping the wall or using a stud finder. However, if the studs are not where you want to put the hanger, you will need to drill a hole in the wall and insert a hollow anchor. This is a hanger with a screw and expanding toggle at one end. Push this through the hole and the ends open out. When screw is tightened, it braces the hanger against the wall from both sides.

If uncertain of the size, type and loading of any hanger, consult your supplier as he is bound to have the right one for your needs.

Materials you’ll need:

• Suitable hangers
• Plastic wall anchors
• Doweling
• PVA glue

Tools you’ll need:

• Stud finder
• Hammer
• Drill
• Screwdriver

You may also be interested in :

  •  handyman services sydney

    Framing A Wall - Here Are The Steps

Filed Under: Wall Construction Tagged With: Wall Hanging

Framing A Wall – Here Are The Steps

February 12, 2014 by Billy Soler

Framing A Wall – Here Are The Steps
 handyman services sydney
Photo : diyadvice.com

If a large room is to be divided into two smaller ones or a garage is to be turned into living space, you will need timber framing either on the wall or located where the partition is to go. Over this framing goes the wallboard or other finish so the frame is the skeleton of the partition or lining.

The frame here is for a non-load-bearing wall. More technical know-how is needed before you start playing with the walls, which hold your house up. In any case, always check with your local council to ensure any work you plan meets their building requirements.

Planning.

If the partition is to run across the ceiling joists it can be placed almost anywhere. If it is to run with the joists it must be located directly under one or have battening built out from the joists. When you have settled on the location of the partition, position the doorway in the most convenient spot and ensure it is big enough for the access you will need.

Cutting the frame.

Now cut the top plate and the bottom plate (the timber pieces at top and bottom of the partition). Try to cut these out of single lengths of timber Remember that the bottom plate does not go under the door. Cut these lengths and place them side-by-side, marking for stud locations.

Snap a chalk line on the floor where the sole plate is to go. If the floor is not quite level, pack scrap of timber (shim) under the sole plate and check it with the level.

With the sole plate fixed, use a long straight 2 x 4 to check where the top plate should go. It should be directly over the sole plate. Check by placing a straightedge over the 2 x 4 and use a level to make it plumb.

Check the distance from floor to ceiling, If it is even all over you can install the upright sections of the partition (the studs) and the top plate as one unit, nailing through the plate and straight through the top of each stud. If the distance from floor to ceiling is not even, the top plate must be nailed in position first and the studs cut to fit then nailed to the top plate as follows:

If the wall runs across the joists, nail the top plate to each joist. If you cannot nail to the joist, install bridging pieces of 2 x 4 to the joists with two nails through each end of the bridging piece.

Now nail the studs to the top plate with skew nailing, punching the nails below the surface of the timber. Skew nailing simply means driving the nails into the sides of the stud at about a 45 degree angle so the nails go through the stud into the top plate. Drive two nails into each broad side of the stud and one nail into the narrow side.

Fix the studs to the sole plate in the same way. Remember all your nails and fixings will be concealed by the wallboard later on.

Allow a doorway about 76mm wider and 50mm higher than the door itself. Extra timber called noggin, is fixed on both sides of the door opening. Ready cut door jams are available to make door framing a little easier. Since the floor under the door is seldom quite level pack the jamb with timber and check with a strait edge and plumb rule on one side. Sight the other side from the first side. While working it may help to brace the squared-up frame with timber cleats nailed in place temporarily. The jamb uprights are skew nailed into the sole plate.

Once the frame is complete all that remains is to clad the timber with your choice of hardboard and finish as desired. Hang a door in the doorway and you have a completed partition.

Material you’ll need:

  • Timber 2 x 4s
  • Nails
  • Timber shim
  • Doorjamb

Tools you’ll need:

  • Measuring tape
  • Straightedge
  • Level
  • Hammer
  • Saw
  • Chalk line
  • Plumb bob

You may also be interested in :

  • Photo : lifestyle.allwomenstalk.com

    How To Build a Children's Playroom Chalkboard

  • jim's handyman

    Re-Caulk Your Bathtub, Here's how....

  • sydney metro handyman services

    Building a BBQ That Won’t Carry Smoke

Filed Under: Handyman Services, Wall Construction Tagged With: Framing a wall

Our Preferred Partners For Drafting Services in Sydney

House Plan Design & Drafting Services
24 Pines Parade, Gymea NSW 2227
Facebook
Google+

For Decking Builders in Sydney, We Use The Pergolas Sydney Authority Services

Sydney Timber Decking Specialists
7/40 The Grand Parade
Brighton Le Sands , NSW 2216
Phone: (02) 8080 4340
Facebook
Google+ MAP

Our Partners For Driving School in Campbelltown

Sydney South Driving School
Phone 0409129275
10 Salerno Pl, Blairmount , NSW 2559
Facebook
Youtube
Liverpool Driving School
Unit 22, 32 Castlereagh St, Liverpool, NSW, 2170
Phone: 0282779091

Copyright © 2025 · Lifestyle Pro Theme on Genesis Framework · WordPress · Log in