• ABOUT
  • PRIVACY POLICY
  • TERMS AND CONDITIONS
  • CONTACT US

Handyman Sydney

Home Improvement, Home Repair And Home Renovation

Installed a Lock …Now What

April 6, 2014 by Billy Soler

Installed a Lock …Now What
home repair handyman
Photo: todayshomeowner.com

Two of the most common locks which can be installed by a home handyman are the mortise lock, which is recessed into the face of the door; and rim locks, mounted on the face of the door. For security, both locks should feature a deadlock mechanism, which triggers the lock automatically when the door is closed so only the key can open the lock from either side of the door. This means if the door has glass panels no-one can open the door by reaching through a broken pane. It also means anyone entering through another access cannot use the main door to carry away your possessions and may well leave empty-handed rather than be seen passing goods through a window.

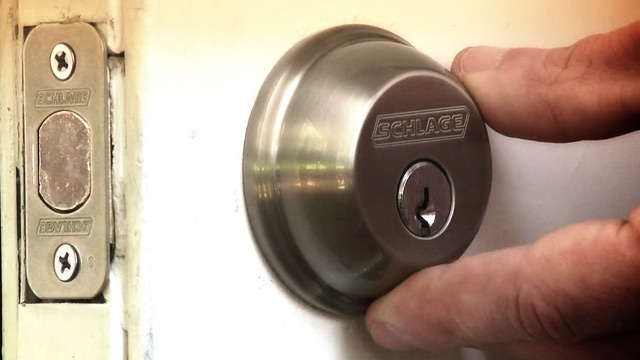
Fixing a cylinder rim dead latch.

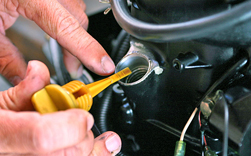
If the door already has a mortise lock, which you wish to retain, position the new lock above it at about shoulder height. If the new lock is a replacement, remove the old lock and fill in the old mortise with wood, glued and sanded back. Then position the new lock slightly above the door centre. The new lock will come with a paper diagram called a template, which shows where to drill the required holes. Place the paper template against the inside of the door, with the edge line even with the edge of the door. Punch through the diagram to indicate where to locate cylinder, and screw holes. Drill the cylinder hole using a hole saw attachment the same diameter as the lock cylinder. Next, slip the cylinder ring over the cylinder and insert into door. The connecting bar is designed so it can be shortened to suit different door thickness. Follow the manufacturer’s instructions to obtain the right amount of projection. Remove the cover plate from the lock and fix to the door with wood screws. Take the key out of the lock and insert cylinder and ring assembly into door. Make sure the connecting bar enters the lock mechanism. Fix the cylinder in place with connecting screws fitted through the top pair of holes in the cover plate. Try the key in the cylinder. If it does not turn freely, check that the connecting bar is correctly shortened.

Attach the lock case to the cover plate and screw into position.

Line up the striker plate (also called the staple) with the lock assembly. Using the plate as a pattern, mark the jamb where it is to be mortised, and cut the mortise. Using a mortise chisel makes this job easier. Mark the screw positions and fix the staple onto the jamb so it sits flush with the jamb.

Mortise locks.

Mortise locks are recessed into the face of the door. There are a number of different types such as claw bolt design for sliding doors, deadlocking types suitable for security screen doors and narrow designs for aluminium section doorframes. Most are installed in a similar way.

Place the lock against the edge of the door and mark where the handle bar and keyhole are to go. Allow for recessing the faceplate into the door. Mark a centre line down the depth of the door, the same depth as the lock and bore mortise holes the length of the lock. Use a chisel to cut out the mortise. Bore holes in the door where you have marked the position of handle and keyhole. Insert the lock in the mortise and mark the position of the faceplate on the inside of the door. Chisel out this outline to take the faceplate and mark holes for the faceplate screws. Fasten the lock mechanism in place, fit the handle bar through the lock and mark where door furniture is to go (handles and knobs). Fit these. Close the door and locate the position for the striker plate so this will line up with the lock mechanism. Using the plate as a pattern, mark the two recesses where latch and bolt enter and cut out enough wood to accommodate them. Screw the striker plate into position.

Key in knob locks.

This type of lock is decorative as well as functional. It comprises a locking mechanism, an inner doorknob and an outer knob, which includes the keyhole. Some types incorporate an automatic dead latching mechanism so only the key can move the bolt. Other styles, commonly called privacy latches, include a turn button, which locks or unlocks the door from inside. Sometimes a key can still open this lock from the outside. Various styles can be purchased to be operated with a key from the outside only or by key from both sides. Various decorative trims and finishes are available to suit different decorating schemes. To install most such locks you only need to drill two holes, one on the inside, one on the outside face of the door, and cut a recessed panel to take the latch face plate, with a corresponding recess in the jamb to take the striker plate.

Other security devices.

A stout lock on the main entrance is your best defence against intrusion. But there are times when you must open the door. Minimise risk by installing a chain device so you can talk to callers through a small opening. Some chains include an alarm device, which sounds if an attempt is made to force the door.

Securing windows, garage doors and other points of entry is also easier with new kinds of locking bolt devices which can be fitted to these and many other problem areas, including caravans. For other danger zones around your home, such as the gate leading to a swimming pool enclosure, there are specially designed safety catches and hinges which cannot be manipulated by young children, but are easy for stronger people to use. Features such as automatic closing ensure security gates cannot be left open accidentally.

Materials you’ll need:

  • New lock and instructions
  • Wood filler or putty Wood glue Sandpaper

Tools you’ll need:

  • Drill with hole saw attachments
  • Screwdriver
  • Mortise chisel
  • Woodworking chisel

You may also be interested in :

  • jim's handyman

    Re-Caulk Your Bathtub, Here's how....

  • handyman service company

    Maintenance of Your Swimming Pool Tip and Instructions

  • sydney metro handyman services

    Building a BBQ That Won’t Carry Smoke

Filed Under: Handyman Services

Workshops & Home Improvement Safety

April 4, 2014 by Billy Soler

Workshops & Home Improvement Safety
handyman home renovation expo sydney
Photo: farmsafe.org.au

Accidents don’t just -happen- they have causes and the causes can usually be removed. By working and acting with safety in mind you can prevent many accidents so it is up to you to develop safe habits and not be tempted by unsafe short cuts. Remember these points and your workshop will be a much safer place.

  1. Wear the right clothes for the job. They should be close-fitting and protective, including hard shoes, protective work gloves, a safety (hard) hat if appropriate. Suitable goggles or a face shield should always protect eyes. All welding jobs should be properly screened as weld flash can do serious damage to unprotected eyes.
  2. Guard against fires. Keep workshop clean, and clear of sawdust, wood shavings, rags and debris, which could be a fire hazard. Make a habit of sweeping up after every job and deposit all rubbish and sweepings in a closed metal bin. Do not use sawdust to catch oil drippings. Keep a small portable fire extinguisher in an easily accessible place.
  3. Provide adequate ventilation. Installing a good exhaust fan is recommended. When using toxic chemicals or working with dust or fumes, wear a suitable dust filter or protective facemask. If using a respirator, make sure it is right for the job and thoroughly cleaned after use. Check with your supplier as to the type of protection needed for a particular job.
  4. Lighting must be adequate. A good guide is to provide around UW for each square metre of workspace. An extra working light over the bench is helpful for safe working. As well the workshop walls could be painted white or a light colour to reflect additional light.
  5. Fit a stout lock on the door, such as a padlock, for safety and security.
  6. Keep children out of the area and never let them play in the workshop. Don’t encourage visitors while you are working, as they will distract your concentration.
  7. Keep a first aid kit handy.

Materials you’ll need:

  • Protective clothing
  • Goggles or suitable face mask
  • Closed metal rubbish bin
  • Exhaust fan
  • Padlock
  • First aid kit

You may also be interested in :

  • home repair handyman

    Installed a Lock ...Now What

  • jim's handyman

    Re-Caulk Your Bathtub, Here's how....

  • handyman services review

    A Handyman's Guide to Prunning Plants, Trees

Filed Under: Handyman Services

Maintain a Boat Your Boat in Sydney Waters

March 29, 2014 by Billy Soler

Maintain a Boat Your Boat in Sydney Waters
home renovations sydney
Photo: cleaningshop.com.au

Fibreglass is the common name which describes a combination of Polyester resin with glass fibre reinforcement used in your boat.

Fibreglass hulls and combings can be maintained with a fibreglass repair kit. This usually comprises polyester resin and hardener in separate containers, inert filler for making polyester putty, chopped strand fibreglass mat and clean-up solvent. Mixing cups, spatulas and measuring spoon may also be included. Instructions should be provided.

To repair a fibreglass boat.

Before commencing ensure you wear suitable protection on your hands and arms so as not to come in contact with the fibreglass. Clean away all fragments and cracked paint or other coatings from the damaged section using a sanding disc, emery cloth or other file then brush or wipe out loose fragments and dust.

All tools putty knife, brush for the resin, etc. must be cleaned with acetone or clean-up solvent- Turps or kerosene should not be used.

Punctures.

Cut a section of fibre mat to fit the area Brush resin hardener onto the damaged area then work the same mixture well into the fibre mat, removing air bubbles with the flat of a knife-

When mixing filler to make up putty, take care not to use too much filler or the putty won’t set hard or evenly. The filler should be worked into the depressed area and the impregnated mat bedded firmly over the top. Work the mat smoothly down onto the edges of the repair using enough resin/hardener to keep the edges covered.

Splits and cracks.

Cracks should be repaired before the crack can spread too far.

The putty should be worked into the cracked area. If the crack is very fine, ease it open and run in resin/hardener mix, then seal with putty. Fibreglass mat can also be used as a bandage to strengthen split or cracked oars. Weight or clamps hold the repair faces together until the fibreglass sets.

Uneven spots can be smoothed out with suitable stopping putty.

You may also be interested in :

  • handyman service company

    Maintenance of Your Swimming Pool Tip and Instructions

  • handyman services castle hill

    Your Boat Motor Running Smoothly?.. Outboard Maintenance Tips

  • handyman services review

    A Handyman's Guide to Prunning Plants, Trees

Filed Under: Handyman Services Tagged With: boat

Easy Roof Repair and Fix Roof Leaks

March 27, 2014 by Billy Soler

Damp patches on walls and ceilings are signs that your roof needs attention. Water entering a house can do a lot of expensive damage.

However, finding the leak can be difficult, as water does not always enter the roof just above the damp patch Often it travels some distance along the roof timbers before it drops onto the ceiling.

The best way to find the leak is to get up under the roof during a rainstorm. Take a torch and look for signs of water coming in. Follow the water to its source and push a length of wire up through the roof at this point so you can find it again when you are up on the roof in dry weather.

If you can’t get under your roof, about the only solution is to go up onto the roof and plug all visible holes. Most leaks are traceable to buckled, split or missing tiles and damaged flashing.

Once you find the leak, wait until the rain has gone to start repairs. When working on the roof take great care. Wear soft-soled shoes such as tennis shoes because most roofing materials are easily cracked, adding to damp problems. Avoid stepping on the edges of tiles and try to work in warm weather when tiles are less brittle and safer to handle.

Tiled roofs.
Terra cotta tiles are usually laid in an overlapping pattern. Movement of the tiles often causes leaks. If the crack is a clean one it can be repaired with suitable roofing cement. Alternatively, slide a sheet of aluminium flashing under the tile so it extends past the butt of the tile in the next course above. Fix the flashing in place with roofing cement. To replace a tile, lift the tiles next to it, cutting the wire ties holding it if necessary. Use wooden wedges to hold adjacent tiles clear so you can lift out the broken tile­. Insert a new tile and gently remove the wedges Ensure edges interlock correctly and renew the ties in the ceiling cavity. If crumbling mortar at the ridge capping is the problem, carefully chip out the old mortar and use a concrete binding material in the new mortar mix to ensure good adhesion. A crack in the ridge capping is best sealed with silicone sealant. There are special types of sealants on the market, building and household. That will suit most jobs around the home. If the crack is too large to fill, you may have to replace that particular capping tile. This involves chipping out the old mortar carefully all around the tile. So as not to disturb the rest of the capping. Ensure the new piece of capping is bedded firmly into place, and sealed with mortar mix.

Metal and fibro roofs.
Cleaning the area thoroughly and repairing with a plastic sealer can repair small holes. A flexible sealer such as silicone is recommended to prevent cracking during hot weather. Embedding a patch of the same roofing material can make temporary repairs in silicone caulking compound.

Slate Roofs.
To mend leaks in slate, insert a piece of flashing under the slate, over the hole and secure it in place with roofing cement. Make sure the flashing extends up beyond the butt of the tile in the course above.

Cedar shingles.
Pushing a piece of aluminium flashing up under the shingle, over the hole, can repair leaks. Ensure the top of the flashing is above the bottom of the shingle in the course above. If the flashing won’t push up past the bottom of the shingle in the course above, slide a hacksaw blade underneath the shingle and saw off the nails that most probably are stopping it. Use a sealant to seal nail holes and overheads of nails. Repair splits by first inserting the flashing as described then driving nails in on each side of the split, as close as possible to the bottom of the overlapping shingle. If a shingle is missing cut off the nails that were holding it in place and, insert a new shingle, held in place with nails driven just below the butt of the overlapping shingle. Some shingles, such as asphalt, require a combination of special roofing cement and nails to hold them in place.

Flashing problems.
Flashing is the metal or plastic sheeting that diverts rain away from chimneys, pipes, joins between gutters etc. The flashing should be checked once a year to ensure no holes are developing where water can penetrate. Loose or leaking flashing can be plugged with a suitable sealing compound worked into the crack with a putty knife. Sometimes all that is needed is to bend the flashing back down again properly to ensure it is in contact with the guttering or roof surface. (See also Valleys and Flashing).

Materials you’ll need:

• Roofing cement
• Lengths of wire
• Flashing material
• Wooden wedges
• Roofing cement
• Mortar
• Concrete binder
• Metal or fibro, patches if required
• Sealing compound.

Tools you’ll need:

• Hacksaw
• Torch

You may also be interested in :

  • jim's handyman

    Re-Caulk Your Bathtub, Here's how....

  • spinners sydney

    Safe Handling of Waste Disposal‎

  • hire a hubby

    Aussie Lawn Mower Care Guide

Filed Under: Handyman Services Tagged With: roofing

Re-Caulk Your Bathtub, Here’s how….

March 17, 2014 by Billy Soler

Re-Caulk Your Bathtub, Here’s how….

With time, joints around sinks, basins and baths can deteriorate. This makes cleaning difficult and also lets water seep between sink and wall, causing possible damage, which may not become obvious until too late.

Use a putty knife and the edge of a narrow scraper to remove all grit, grease and fragments of grout or sealer from the crevice between bath or sink and wall.

Brush out crevice with a stiff brush soaked in turps or acetone and wipe with a clean cloth.

Make sure the surface is thoroughly dried by wrapping a cloth around the putty knife and running it into the crevice.

jim's handyman
Photo : caulkright.com.au

Use a tube of special bathtub caulking compound. This can be applied straight from the tube, simply cut the nozzle so the size bead, which comes out, is slightly wider than the gap between tub and wall. For a thin bead, cut close to the tube tip; for a thicker bead, cut further down.

Squeeze the caulk in a continuous bead all around the tub where it meets the wall­. Work the caulking well into the crevice using a wet rag wrapped around your index finger. Keep a container of water handy for dipping the rag to wet it as you work. Where excess sealer squeezes over the edges, let it dry then trim off with a trimming knife or razor blade.

If there is a very wide gap, say 5mm or more between the sink and wall, it should be filled with epoxy cement to give a firm, impervious bond to masonry and tiles. Around taps, use a ceramic tile cement to fill the crevices between tiles and pipes.

Materials you’ll need:

• Bathtub caulking
• Epoxy cement
• Ceramic tile cement
• Turps or acetone
• Clean rags
• Water container.

Tools you’ll need:

• Putty knife or narrow scraper
• Stiff brush
• Scissors
• Trimming knife or razor blade

You may also be interested in :

  • sydney metro handyman services

    Building a BBQ That Won’t Carry Smoke

  • home repair handyman

    Installed a Lock ...Now What

  • handyman services review

    A Handyman's Guide to Prunning Plants, Trees

Filed Under: Handyman Services Tagged With: bathroom

  • 1
  • 2
  • 3
  • Next Page »

Our Preferred Partners For Drafting Services in Sydney

House Plan Design & Drafting Services
24 Pines Parade, Gymea NSW 2227
Facebook
Google+

For Decking Builders in Sydney, We Use The Pergolas Sydney Authority Services

Sydney Timber Decking Specialists
7/40 The Grand Parade
Brighton Le Sands , NSW 2216
Phone: (02) 8080 4340
Facebook
Google+ MAP

Our Partners For Driving School in Campbelltown

Sydney South Driving School
Phone 0409129275
10 Salerno Pl, Blairmount , NSW 2559
Facebook
Youtube
Liverpool Driving School
Unit 22, 32 Castlereagh St, Liverpool, NSW, 2170
Phone: 0282779091

Copyright © 2025 · Lifestyle Pro Theme on Genesis Framework · WordPress · Log in