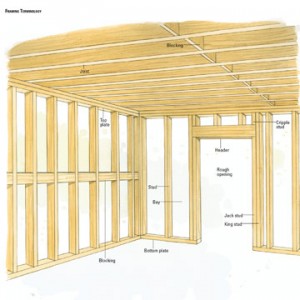
If a large room is to be divided into two smaller ones or a garage is to be turned into living space, you will need timber framing either on the wall or located where the partition is to go. Over this framing goes the wallboard or other finish so the frame is the skeleton of the partition or lining.
The frame here is for a non-load-bearing wall. More technical know-how is needed before you start playing with the walls, which hold your house up. In any case, always check with your local council to ensure any work you plan meets their building requirements.
Planning.
If the partition is to run across the ceiling joists it can be placed almost anywhere. If it is to run with the joists it must be located directly under one or have battening built out from the joists. When you have settled on the location of the partition, position the doorway in the most convenient spot and ensure it is big enough for the access you will need.
Cutting the frame.
Now cut the top plate and the bottom plate (the timber pieces at top and bottom of the partition). Try to cut these out of single lengths of timber Remember that the bottom plate does not go under the door. Cut these lengths and place them side-by-side, marking for stud locations.
Snap a chalk line on the floor where the sole plate is to go. If the floor is not quite level, pack scrap of timber (shim) under the sole plate and check it with the level.
With the sole plate fixed, use a long straight 2 x 4 to check where the top plate should go. It should be directly over the sole plate. Check by placing a straightedge over the 2 x 4 and use a level to make it plumb.
Check the distance from floor to ceiling, If it is even all over you can install the upright sections of the partition (the studs) and the top plate as one unit, nailing through the plate and straight through the top of each stud. If the distance from floor to ceiling is not even, the top plate must be nailed in position first and the studs cut to fit then nailed to the top plate as follows:
If the wall runs across the joists, nail the top plate to each joist. If you cannot nail to the joist, install bridging pieces of 2 x 4 to the joists with two nails through each end of the bridging piece.
Now nail the studs to the top plate with skew nailing, punching the nails below the surface of the timber. Skew nailing simply means driving the nails into the sides of the stud at about a 45 degree angle so the nails go through the stud into the top plate. Drive two nails into each broad side of the stud and one nail into the narrow side.
Fix the studs to the sole plate in the same way. Remember all your nails and fixings will be concealed by the wallboard later on.
Allow a doorway about 76mm wider and 50mm higher than the door itself. Extra timber called noggin, is fixed on both sides of the door opening. Ready cut door jams are available to make door framing a little easier. Since the floor under the door is seldom quite level pack the jamb with timber and check with a strait edge and plumb rule on one side. Sight the other side from the first side. While working it may help to brace the squared-up frame with timber cleats nailed in place temporarily. The jamb uprights are skew nailed into the sole plate.
Once the frame is complete all that remains is to clad the timber with your choice of hardboard and finish as desired. Hang a door in the doorway and you have a completed partition.
Material you’ll need:
- Timber 2 x 4s
- Nails
- Timber shim
- Doorjamb
Tools you’ll need:
- Measuring tape
- Straightedge
- Level
- Hammer
- Saw
- Chalk line
- Plumb bob


