• ABOUT
  • PRIVACY POLICY
  • TERMS AND CONDITIONS
  • CONTACT US

Handyman Sydney

Home Improvement, Home Repair And Home Renovation

How To Do Precision Drilling at Home

April 2, 2014 by Billy Soler

The electric drill was probably one of the handiest items ever invented to help the do-it-yourself. But many handymen still have trouble with accurate 90 deg. or angle drilling and tricky jobs like drilling round stock or edge sanding. The fact is, few of us are gifted with the steady hands and precision judgement these jobs demand.

One way to drill dowel holes accurately is by fitting your drill to a drill stand, a large, lever operated attachment, which feeds the bit into the work accurately.

Another useful attachment is a portable drill guide, which fits a variety of electric drills, and does not tie you down to the work bench to use it.

A precision drill guide consists of a circular base cast in a material such as aluminium, with two vertical guides. These guides can slide beyond the base or they can be locked in place Depth and direction of drilling can also be controlled.

To attach a drill guide to your electric drill, you must first remove the chuck. Check with your owner’s manual for removing the chuck from your brand of drill.

Attaching the drill guide.

The guide usually includes an adaptor spindle to hold the attachment. The adaptor is fitted first then the guide is fitted on and secured in position, The most common jobs you would need the guide for would be 90 degree and angle drilling, drilling into round stock and edge drilling. By changing the bits on your drill, you can change the function of the tool to jobs like routing, sanding, shaping, hole sawing etc.

Drilling 90 deg. Angles.

Ensure the drill guide base is flush with the part to be drilled. To drill several holes all to precise depth, first rest the drill on a surface flush with the base, measure between the adapter and locking device on the drill guide and this will give you the depth to be drilled. The lock will control the depth of drilling each time. The same method can be used with a countersink bit in the drill. Test first on a scrap piece of timber.

Drilling holes.

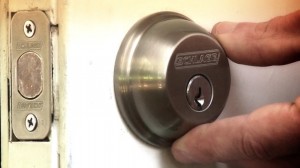
Use a hole saw attachment in the drill guide for accurate hole drilling, say when fitting a new door lock. When cutting holes up to 21/4 inches diameter, use clamps for greater stability. On painted or fragile surfaces, stretch masking or electrical tape around the outer ring of the drill guide before starting work.

Drilling angles.

To drill several holes at precisely the same angles, extend the two guide rods beyond the base of the attachment. When drilling at an angle, the drill bit will tend to “walk” away from the point to be drilled. To overcome this, first drill a shallow pilot hole at 90 degrees or start an angled hole very slowly at first.

Edge drilling.

Useful for installing door locks, dowelling and stud drilling and other tricky edge work. Extend the drill guide’s two rods beyond the base and place the base flat on the edge of the part to be drilled, Tighten the guide rods against the sides of the part so the drill touches the edge of the part in the centre.

Drilling round stock is a similar procedure but you will need to use the depth stop on the attachment if drilling through a single wall of a pipe only. Small round work can be placed on a V-shaped support block for 90 deg drilling.

Work bench mounting.

With the guide mounted under the bench, the tool can then be used as a router or shaper, edge sander or hand held sander, with the use of various drill bits.
Materials you’ll need:

  • Drill owner’s manual
  • Safety glasses
  • Scrap timber
  • Masking or electrical tape
  • Fiat head bolts

Tools you’ll need:

  • Electric drill
  • Drill guide attachment
  • Drill bits
  • Straight edge

You may also be interested in :

  • handyman sydney eastern suburbs

    Best Ways to Keep Your Carpets Clean

  • Photo: goodgearguide.com.au

    How to install a doorbell

  • sydney cbd plastering

    DIY Top Tip - Build Pergolas, Deck, Patio

Filed Under: Handyman Sydney, Structural

Tool Maintenance What To Oil

March 31, 2014 by Billy Soler

Tool Maintenance What To Oil
home renovation blog
Photo: ebay.com.au

Some of the areas around your home that need regular lubrication are hinges, door locks, garage doors, windows, sliding door tracks. Some electric motors and appliances and tools for home and workshop. Assemble a basic kit of lubricants so you can do these jobs regularly. The items you will need are light household oil, powdered graphite, an all-purpose spray lubricant and rust inhibitor, petroleum jelly, silicon spray, and sometimes-penetrating oil. If any of your appliances call for a specific lubricant, add that to your collection.

If hinges squeak, spray lightly with silicone spray. If the hinges are rusty, spray with a water repellent rust inhibitor, leave for an hour or so then clean off with a cloth.

Swing doors should be lubricated with a little graphite or grease once a year.

Tracks of sliding doors can be lubricated with graphite or petroleum jelly.

An easy way to oil a door lock is by oiling the key, inserting it into the lock and working it a few times. Avoid using too much oil or it will run onto the door. Latches should also be oiled to keep them working smoothly without having to be slammed shut.

Wooden sash windows and sliding metal windows all have a tendency to stick now and again. Thoroughly clean then spray with a suitable dry lubricant. Allow the spray to dry then move the sash and spray the area previously covered by the sash.

Many modern motors are permanently lubricated and should only be oiled on manufacturer’s instructions. Motors with oiling holes or points require a few drops of light household oil at these points about every 3 months.

Kitchen appliances are probably best oiled with a vegetable oil where they come into contact with food.

Drawers will work more smoothly if you rub the edges and tracks with soap, a wax candle or spray with silicon spray.

Penetrating oil is used to-loosen rusted or “frozen” nuts and bolts. Pour or spray on the affected part and leave for a minute or two then tap to assist the oil to penetrate. You should then be able to loosen the nut with a wrench or pliers.

You may also be interested in :

  • Indicators on Getting Your Employees Ready For Their Heavy Vehicle Licence You Need To Know

    Indicators on Getting Your Employees Ready For Their Heavy Vehicle Licence You Need To Know

  • Advance Through Innovation

    Advance Through Innovation

  • home plumbing system

    What is Plumbing

Filed Under: Handyman Sydney

Maintain a Boat Your Boat in Sydney Waters

March 29, 2014 by Billy Soler

Maintain a Boat Your Boat in Sydney Waters
home renovations sydney
Photo: cleaningshop.com.au

Fibreglass is the common name which describes a combination of Polyester resin with glass fibre reinforcement used in your boat.

Fibreglass hulls and combings can be maintained with a fibreglass repair kit. This usually comprises polyester resin and hardener in separate containers, inert filler for making polyester putty, chopped strand fibreglass mat and clean-up solvent. Mixing cups, spatulas and measuring spoon may also be included. Instructions should be provided.

To repair a fibreglass boat.

Before commencing ensure you wear suitable protection on your hands and arms so as not to come in contact with the fibreglass. Clean away all fragments and cracked paint or other coatings from the damaged section using a sanding disc, emery cloth or other file then brush or wipe out loose fragments and dust.

All tools putty knife, brush for the resin, etc. must be cleaned with acetone or clean-up solvent- Turps or kerosene should not be used.

Punctures.

Cut a section of fibre mat to fit the area Brush resin hardener onto the damaged area then work the same mixture well into the fibre mat, removing air bubbles with the flat of a knife-

When mixing filler to make up putty, take care not to use too much filler or the putty won’t set hard or evenly. The filler should be worked into the depressed area and the impregnated mat bedded firmly over the top. Work the mat smoothly down onto the edges of the repair using enough resin/hardener to keep the edges covered.

Splits and cracks.

Cracks should be repaired before the crack can spread too far.

The putty should be worked into the cracked area. If the crack is very fine, ease it open and run in resin/hardener mix, then seal with putty. Fibreglass mat can also be used as a bandage to strengthen split or cracked oars. Weight or clamps hold the repair faces together until the fibreglass sets.

Uneven spots can be smoothed out with suitable stopping putty.

You may also be interested in :

  • spinners sydney

    Safe Handling of Waste Disposal‎

  • handyman home renovation expo sydney

    Workshops & Home Improvement Safety

  • Photo : lifestyle.allwomenstalk.com

    How To Build a Children's Playroom Chalkboard

Filed Under: Handyman Services Tagged With: boat

Easy Roof Repair and Fix Roof Leaks

March 27, 2014 by Billy Soler

Damp patches on walls and ceilings are signs that your roof needs attention. Water entering a house can do a lot of expensive damage.

However, finding the leak can be difficult, as water does not always enter the roof just above the damp patch Often it travels some distance along the roof timbers before it drops onto the ceiling.

The best way to find the leak is to get up under the roof during a rainstorm. Take a torch and look for signs of water coming in. Follow the water to its source and push a length of wire up through the roof at this point so you can find it again when you are up on the roof in dry weather.

If you can’t get under your roof, about the only solution is to go up onto the roof and plug all visible holes. Most leaks are traceable to buckled, split or missing tiles and damaged flashing.

Once you find the leak, wait until the rain has gone to start repairs. When working on the roof take great care. Wear soft-soled shoes such as tennis shoes because most roofing materials are easily cracked, adding to damp problems. Avoid stepping on the edges of tiles and try to work in warm weather when tiles are less brittle and safer to handle.

Tiled roofs.
Terra cotta tiles are usually laid in an overlapping pattern. Movement of the tiles often causes leaks. If the crack is a clean one it can be repaired with suitable roofing cement. Alternatively, slide a sheet of aluminium flashing under the tile so it extends past the butt of the tile in the next course above. Fix the flashing in place with roofing cement. To replace a tile, lift the tiles next to it, cutting the wire ties holding it if necessary. Use wooden wedges to hold adjacent tiles clear so you can lift out the broken tile­. Insert a new tile and gently remove the wedges Ensure edges interlock correctly and renew the ties in the ceiling cavity. If crumbling mortar at the ridge capping is the problem, carefully chip out the old mortar and use a concrete binding material in the new mortar mix to ensure good adhesion. A crack in the ridge capping is best sealed with silicone sealant. There are special types of sealants on the market, building and household. That will suit most jobs around the home. If the crack is too large to fill, you may have to replace that particular capping tile. This involves chipping out the old mortar carefully all around the tile. So as not to disturb the rest of the capping. Ensure the new piece of capping is bedded firmly into place, and sealed with mortar mix.

Metal and fibro roofs.
Cleaning the area thoroughly and repairing with a plastic sealer can repair small holes. A flexible sealer such as silicone is recommended to prevent cracking during hot weather. Embedding a patch of the same roofing material can make temporary repairs in silicone caulking compound.

Slate Roofs.
To mend leaks in slate, insert a piece of flashing under the slate, over the hole and secure it in place with roofing cement. Make sure the flashing extends up beyond the butt of the tile in the course above.

Cedar shingles.
Pushing a piece of aluminium flashing up under the shingle, over the hole, can repair leaks. Ensure the top of the flashing is above the bottom of the shingle in the course above. If the flashing won’t push up past the bottom of the shingle in the course above, slide a hacksaw blade underneath the shingle and saw off the nails that most probably are stopping it. Use a sealant to seal nail holes and overheads of nails. Repair splits by first inserting the flashing as described then driving nails in on each side of the split, as close as possible to the bottom of the overlapping shingle. If a shingle is missing cut off the nails that were holding it in place and, insert a new shingle, held in place with nails driven just below the butt of the overlapping shingle. Some shingles, such as asphalt, require a combination of special roofing cement and nails to hold them in place.

Flashing problems.
Flashing is the metal or plastic sheeting that diverts rain away from chimneys, pipes, joins between gutters etc. The flashing should be checked once a year to ensure no holes are developing where water can penetrate. Loose or leaking flashing can be plugged with a suitable sealing compound worked into the crack with a putty knife. Sometimes all that is needed is to bend the flashing back down again properly to ensure it is in contact with the guttering or roof surface. (See also Valleys and Flashing).

Materials you’ll need:

• Roofing cement
• Lengths of wire
• Flashing material
• Wooden wedges
• Roofing cement
• Mortar
• Concrete binder
• Metal or fibro, patches if required
• Sealing compound.

Tools you’ll need:

• Hacksaw
• Torch

You may also be interested in :

  • home repair handyman

    Installed a Lock ...Now What

  • handyman services castle hill

    Your Boat Motor Running Smoothly?.. Outboard Maintenance Tips

  • spinners sydney

    Safe Handling of Waste Disposal‎

Filed Under: Handyman Services Tagged With: roofing

Re-Caulk Your Bathtub, Here’s how….

March 17, 2014 by Billy Soler

Re-Caulk Your Bathtub, Here’s how….

With time, joints around sinks, basins and baths can deteriorate. This makes cleaning difficult and also lets water seep between sink and wall, causing possible damage, which may not become obvious until too late.

Use a putty knife and the edge of a narrow scraper to remove all grit, grease and fragments of grout or sealer from the crevice between bath or sink and wall.

Brush out crevice with a stiff brush soaked in turps or acetone and wipe with a clean cloth.

Make sure the surface is thoroughly dried by wrapping a cloth around the putty knife and running it into the crevice.

jim's handyman
Photo : caulkright.com.au

Use a tube of special bathtub caulking compound. This can be applied straight from the tube, simply cut the nozzle so the size bead, which comes out, is slightly wider than the gap between tub and wall. For a thin bead, cut close to the tube tip; for a thicker bead, cut further down.

Squeeze the caulk in a continuous bead all around the tub where it meets the wall­. Work the caulking well into the crevice using a wet rag wrapped around your index finger. Keep a container of water handy for dipping the rag to wet it as you work. Where excess sealer squeezes over the edges, let it dry then trim off with a trimming knife or razor blade.

If there is a very wide gap, say 5mm or more between the sink and wall, it should be filled with epoxy cement to give a firm, impervious bond to masonry and tiles. Around taps, use a ceramic tile cement to fill the crevices between tiles and pipes.

Materials you’ll need:

• Bathtub caulking
• Epoxy cement
• Ceramic tile cement
• Turps or acetone
• Clean rags
• Water container.

Tools you’ll need:

• Putty knife or narrow scraper
• Stiff brush
• Scissors
• Trimming knife or razor blade

You may also be interested in :

  • spinners sydney

    Safe Handling of Waste Disposal‎

  • handyman service company

    Maintenance of Your Swimming Pool Tip and Instructions

  • handyman services review

    A Handyman's Guide to Prunning Plants, Trees

Filed Under: Handyman Services Tagged With: bathroom

  • « Previous Page
  • 1
  • …
  • 3
  • 4
  • 5
  • 6
  • 7
  • …
  • 13
  • Next Page »

Our Preferred Partners For Drafting Services in Sydney

House Plan Design & Drafting Services
24 Pines Parade, Gymea NSW 2227
Facebook
Google+

For Decking Builders in Sydney, We Use The Pergolas Sydney Authority Services

Sydney Timber Decking Specialists
7/40 The Grand Parade
Brighton Le Sands , NSW 2216
Phone: (02) 8080 4340
Facebook
Google+ MAP

Our Partners For Driving School in Campbelltown

Sydney South Driving School
Phone 0409129275
10 Salerno Pl, Blairmount , NSW 2559
Facebook
Youtube
Liverpool Driving School
Unit 22, 32 Castlereagh St, Liverpool, NSW, 2170
Phone: 0282779091

Copyright © 2025 · Lifestyle Pro Theme on Genesis Framework · WordPress · Log in