• ABOUT
  • PRIVACY POLICY
  • TERMS AND CONDITIONS
  • CONTACT US

Handyman Sydney

Home Improvement, Home Repair And Home Renovation

Building a BBQ That Won’t Carry Smoke

February 12, 2014 by Billy Soler

Building a BBQ That Won’t Carry Smoke
sydney metro handyman services
Photo: houzz.com

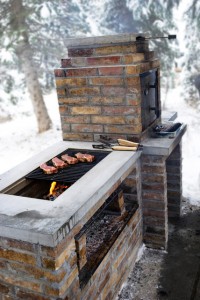
Even the smallest garden can usually accommodate a barbecue, even if only a small portable unit. Where there is room, permanent structures can be built of masonry, cement blocks or bricks­. Decorative stone can be used but it is recommended that the firebox be lined with brick, as some stones disintegrate in extreme heat. The bricks should be well fired. If they are, they will make a clear ringing sound when hit with a hammer.

Planning the barbecue.

Before building anything permanent, always check your local council’s regulations.

1. Make sure the barbecue won’t carry smoke onto the entertaining area. If the structure is under cover, it should have a hood or flue to carry smoke and fumes away.
2. Plan the roomiest grill/bbq you can, at a cooking height to suit you.
3. When making a brick barbecue, use firebricks to line the firebox sides and bed. Try to use the smallest mortar join you can.
4.Reinforce the firebox underneath with steel rods spanning the width plus 60-75mm to spare on each side. Space the rods evenly at about 10Omm intervals.
5.The grill may be supported on steel rods set into the mortar but the grill itself should not be mortared into place as it must be able to expand and contract as it heats and cools.

To maintain the grill.

• Wash after each use with detergent solution, wash hood and rotisserie if applicable. Stubborn spots can be scrubbed using a wire brush or special barbecue cleaning brush.
• Tighten any screws or bolts regularly. A portable unit on wheels should have the wheels greased regularly.
• If painted parts become damaged, clean the metal and apply rust inhibiting primer then finishing coat. Do not paint grill and grates, which are in contact with food.
• Repair cracks as soon as they appear. Treat stains as for any brick, concrete or stone structure.

You may also be interested in :

  • home repair handyman

    Installed a Lock ...Now What

  •  handyman services sydney

    Framing A Wall - Here Are The Steps

  • handyman service company

    Maintenance of Your Swimming Pool Tip and Instructions

Filed Under: Backyard, Handyman Services Tagged With: bbq

How To Wall Hanging Anything Guide

February 12, 2014 by Billy Soler

How To Wall Hanging Anything Guide
handyman services sydney cbd
Photo: startlocal.com.au

There are about as many gadgets to help you hang things on walls, as there are walls and things to be hung. What you use and where depends on the construction of the wall and the weight the hanger must support. For example, there are many self-stick hangers that have an adhesive backing that you press onto a clean sealed surface. They are handy for putting up pictures and other lightweight items but are not designed to support very heavy weights.

When hanging things like curtain rods on masonry walls, first insert a plastic wall anchor. The anchors are made for different sized screws so buy a pack of the size to suit your screws. The pack tells you what size bit to use when drilling a hole to take the anchor. Drill the appropriate sized hole and insert the plastic anchor, tapping it all the way in. Next, insert the screw through the item it is to hold and screw it into the anchor. As you screw the resistance you feel tells you the screw is expanding the anchor so it grips the sides of the hole. If you must plug a wall and have no anchor handy, whittle a scrap of doweling to a slight point at one end and hammer it into the hole then insert the screw into the wood. Putting some PVA glue into the hole first before inserting the wooden plug will make it even more secure.

Hanging pictures.

A number of hangers are available to support pictures on different types of walls. Generally, a single picture should be hung so its centre is at an average eye-level to a persons standing in the centre of the room. Using 2 hangers will help keep pictures straight. ­The screw eyes for the picture wire should be placed about a quarter the way down from the top of the frame and the picture should pull downwards, not outwards, on the hanger. For concrete and brick walls, one of the best picture hangers is a plastic hook, which has 3 or 4 thin headless pins projecting from it. The hook is placed flat side to the wall and all four pins hammered in at one time.

For smooth, flat surfaces such as tiles, glass, wood, etc. a self-adhesive hanger is suitable. Ensure the surface is absolutely clean, dry and well sealed then peel off the backing paper protecting the adhesive and press the hook into position. Do not touch the adhesive patch or try to move the hook once positioned as this weakens its gripping power. Leave to set for the time recommended on the pack before hanging anything from the hook.

Angle drive hooks are used for a number of solid wall surfaces. The hook has a hardened pin driven through it at an angle. Simply place the hanger flat against the wall, insert the nail through it and drive in with hammer. In hard wood or tough lathe it is helpful to drill a small pilot hole first. To protect the surface, first make an X with two strips of sticky tape where the nail is to enter the wall. This will prevent any surface finish being damaged.

Hollow walls such as fibro are a problem when you want to hang something. If possible, hangers should be driven into the timber studs behind the walls. Locate these by tapping the wall or using a stud finder. However, if the studs are not where you want to put the hanger, you will need to drill a hole in the wall and insert a hollow anchor. This is a hanger with a screw and expanding toggle at one end. Push this through the hole and the ends open out. When screw is tightened, it braces the hanger against the wall from both sides.

If uncertain of the size, type and loading of any hanger, consult your supplier as he is bound to have the right one for your needs.

Materials you’ll need:

• Suitable hangers
• Plastic wall anchors
• Doweling
• PVA glue

Tools you’ll need:

• Stud finder
• Hammer
• Drill
• Screwdriver

You may also be interested in :

  •  handyman services sydney

    Framing A Wall - Here Are The Steps

Filed Under: Wall Construction Tagged With: Wall Hanging

Framing A Wall – Here Are The Steps

February 12, 2014 by Billy Soler

Framing A Wall – Here Are The Steps
 handyman services sydney
Photo : diyadvice.com

If a large room is to be divided into two smaller ones or a garage is to be turned into living space, you will need timber framing either on the wall or located where the partition is to go. Over this framing goes the wallboard or other finish so the frame is the skeleton of the partition or lining.

The frame here is for a non-load-bearing wall. More technical know-how is needed before you start playing with the walls, which hold your house up. In any case, always check with your local council to ensure any work you plan meets their building requirements.

Planning.

If the partition is to run across the ceiling joists it can be placed almost anywhere. If it is to run with the joists it must be located directly under one or have battening built out from the joists. When you have settled on the location of the partition, position the doorway in the most convenient spot and ensure it is big enough for the access you will need.

Cutting the frame.

Now cut the top plate and the bottom plate (the timber pieces at top and bottom of the partition). Try to cut these out of single lengths of timber Remember that the bottom plate does not go under the door. Cut these lengths and place them side-by-side, marking for stud locations.

Snap a chalk line on the floor where the sole plate is to go. If the floor is not quite level, pack scrap of timber (shim) under the sole plate and check it with the level.

With the sole plate fixed, use a long straight 2 x 4 to check where the top plate should go. It should be directly over the sole plate. Check by placing a straightedge over the 2 x 4 and use a level to make it plumb.

Check the distance from floor to ceiling, If it is even all over you can install the upright sections of the partition (the studs) and the top plate as one unit, nailing through the plate and straight through the top of each stud. If the distance from floor to ceiling is not even, the top plate must be nailed in position first and the studs cut to fit then nailed to the top plate as follows:

If the wall runs across the joists, nail the top plate to each joist. If you cannot nail to the joist, install bridging pieces of 2 x 4 to the joists with two nails through each end of the bridging piece.

Now nail the studs to the top plate with skew nailing, punching the nails below the surface of the timber. Skew nailing simply means driving the nails into the sides of the stud at about a 45 degree angle so the nails go through the stud into the top plate. Drive two nails into each broad side of the stud and one nail into the narrow side.

Fix the studs to the sole plate in the same way. Remember all your nails and fixings will be concealed by the wallboard later on.

Allow a doorway about 76mm wider and 50mm higher than the door itself. Extra timber called noggin, is fixed on both sides of the door opening. Ready cut door jams are available to make door framing a little easier. Since the floor under the door is seldom quite level pack the jamb with timber and check with a strait edge and plumb rule on one side. Sight the other side from the first side. While working it may help to brace the squared-up frame with timber cleats nailed in place temporarily. The jamb uprights are skew nailed into the sole plate.

Once the frame is complete all that remains is to clad the timber with your choice of hardboard and finish as desired. Hang a door in the doorway and you have a completed partition.

Material you’ll need:

  • Timber 2 x 4s
  • Nails
  • Timber shim
  • Doorjamb

Tools you’ll need:

  • Measuring tape
  • Straightedge
  • Level
  • Hammer
  • Saw
  • Chalk line
  • Plumb bob

You may also be interested in :

  • home maintenance sutherland shire

    Repair a Lawn and Ways to Replant Grass

  • Easy Roof Repair and Fix Roof Leaks

    Easy Roof Repair and Fix Roof Leaks

  • handyman services castle hill

    Your Boat Motor Running Smoothly?.. Outboard Maintenance Tips

Filed Under: Handyman Services, Wall Construction Tagged With: Framing a wall

You Can Create An Artificial Brick Wall…yes you can

February 12, 2014 by Billy Soler

You Can Create An Artificial Brick Wall…yes you can

best handyman sydneyWith the fashion for renovating old houses has come an appreciation of the decorative value of traditional surfaces like brick and sandstone. But stripping a wall back to its original brick is fraught with hazards. As well as the fuss and mess, there is the risk of disappointment if the wall is made of odd or unattractive bricks – after all, it was never intended to be seen without its plaster covering. The best way to have an exposed brick wall or room is by using artificial brick tiles. These come in an attractive array of brick finishes and can be used on almost any clean surface, indoor or out. Wallpaper surfaces should be stripped before the brick tiles are applied and unsealed surfaces need a coat of sealer. Gloss surfaces should be sanded back or treated with de-glossing liquid. Once the surface is clean, dry and free of dust, grease and wax, you can apply brick tiles.

For realism, use full wall heights and consider using more than one wall face. When measuring, allow for waste by measuring each wall in full meters. Each carton of tiles specifies how many square meters it will cover and your supplier will tell you how much mortar and adhesive to use with your quantity of tiles.

The tools you require are a spreader for the adhesive, a mortar brush, a sharp knife for cutting heated tiles, plus a small sheet of metal about 1m x 2m. You’ll also need something to heat the bricks up with,

To curve bricks or bend them around corners, heat them on the metal plate suspended about 30Omm over a small electric radiator turned on its back. This softens the tiles making them easy to cut with a sharp knife, a little like cutting bread dough. Be very careful when carrying out this operation- A portable type gas torch is recommended for heat melding any external corners.

To apply the bricks, lay them out as directed by the manufacturers, adjusting the mortar joints (distance between each brick) so you end up with an even course -of bricks at top and bottom-. Use a stick, cut to the width of the joint required, to help keep joints evenly spaced.

Use a notched spreader or putty knife to spread a thin coat of adhesive along the top of the wall, covering enough space to accommodate two rows of bricks (called courses). Also spread adhesives down the left hand side of the wall and one brick width.

Spread adhesive on the back of several bricks. Press them firmly into place where you have applied the adhesive to the wall. Wiggle the brick slightly in the adhesive to bed it firmly. Use your stick to check the joints between bricks. Work all the way across the top then do the second row, starting with a half brick on the left-hand side so the tiles alternate like real brickwork. When the second row is complete come back and alternate with a full brick and half brick down the left hand side where you have spread the adhesive. When you have these vertical and horizontal rows completed, check that the rows will come out even and adjust the mortar joints if necessary white the bricks will still slide. Covering about 1 to 2 square meters at a time with adhesive continue working under the top courses, adding three or four courses at a time then spreading more adhesive and so on.

If the wall is a long one you can keep the courses level by stretching a string line across the area, attaching it to nails driven into the wall, and hooking a line level onto it. When the bubble is centred on the level, you know the string is level and you can then line up courses of bricks with the string.

Once the bricks are all fixed to the wall and evenly spaced you can apply the mortar. Refer to your manufacturer’s instructions as to how long you should wait for adhesive to dry before proceeding.

If the mortar joints need smoothing, crease along them with a wet finger or mortar brush to even them out. See the Bricks & Masonry section for how to rake your joints if this is the effect you want.

In extreme conditions, such as commercial premises or where there is a lot of grime and pollution, the surface may be sealed with a low-glaze sealer, sprayed or brushed onto the surface.

You may also be interested in :

  • We Deliver High-Quality

    We Deliver High-Quality

  • home renovation

    Start Your Own Compost Bin

  • Indicators on Getting Your Employees Ready For Their Heavy Vehicle Licence You Need To Know

    Indicators on Getting Your Employees Ready For Their Heavy Vehicle Licence You Need To Know

Filed Under: Handyman Sydney, Walls Tagged With: Artificial Brick

Bathroom Carpet Rug Do-It-Yourself lil Project

February 11, 2014 by Billy Soler

Bathroom Carpet Rug Do-It-Yourself lil Project
handyman sydney south
Photo: calfinder.com

Bathroom carpet has quite a few advantages. It is warm underfoot, softer if you drop anything and is quieter than tiles. It is also about the only way to change the look of a bathroom floor without the mess and expense of taking up old tiles and putting down new ones, so bathroom carpet can solve a lot of problems, even in rented accommodation, as it can be taken up easily if you move.

You should only use carpet intended for bathrooms. The backing must be non-slip and water resistant You can also use kitchen carpet and indoor-outdoor carpets including artificial grass carpeting. Here is how to carpet your bathroom.

1. Mark out a full sized pattern of your bathroom floor from wrapping paper or other large sheets of paper. Tape the paper together with adhesive tape, overlapping the seams about 2 cm.

2. To mark around fixtures such as toilet bowls, cut a slit in the pattern from the wall to the front edge of the fixture, and another slit the width of the fixture. Fit the paper around the fixture and score with the blunt edge of a pair of scissors, following the shape where it meets the floor. Cut the shape made by the score and test against the fixture to ensure you have a good fit.

3. Lay the paper floor plan upside down on the carpet. Secure it with adhesive tape or pins so it won’t slip while cutting.

4. Cut the carpet out following the floor plan. Use a sharp knife, razor blade or similar, trying not to cut the pile. If necessary, trim the carpet for more precise fit around fixtures.

If your bathroom has any heavy traffic areas, it is a good idea to fit small rugs around fixtures to protect the carpet from excess wear. It can normally be vacuum cleaned, or taken up and draped over a clothes line then hosed clean and left to dry.

Materials you’ll need:

• Bathroom carpet
• Brown paper or newspaper
• Adhesive tape
• Marking pen

Tools you’ll need:

• Tape measure or ruler
• Scissors
• Single edged razor blade or sharp knife

Filed Under: Floors Tagged With: Bathroom carpet

  • « Previous Page
  • 1
  • …
  • 8
  • 9
  • 10
  • 11
  • 12
  • 13
  • Next Page »

Our Preferred Partners For Drafting Services in Sydney

House Plan Design & Drafting Services
24 Pines Parade, Gymea NSW 2227
Facebook
Google+

For Decking Builders in Sydney, We Use The Pergolas Sydney Authority Services

Sydney Timber Decking Specialists
7/40 The Grand Parade
Brighton Le Sands , NSW 2216
Phone: (02) 8080 4340
Facebook
Google+ MAP

Our Partners For Driving School in Campbelltown

Sydney South Driving School
Phone 0409129275
10 Salerno Pl, Blairmount , NSW 2559
Facebook
Youtube
Liverpool Driving School
Unit 22, 32 Castlereagh St, Liverpool, NSW, 2170
Phone: 0282779091

Copyright © 2025 · Lifestyle Pro Theme on Genesis Framework · WordPress · Log in