• ABOUT
  • PRIVACY POLICY
  • TERMS AND CONDITIONS
  • CONTACT US

Handyman Sydney

Home Improvement, Home Repair And Home Renovation

Build Shelves at Home, Easy Steps

March 7, 2014 by Billy Soler

Build Shelves at Home, Easy Steps
property maintenance sutherland
Photo : teachings.com.au

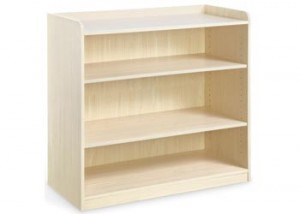
No home can have too much shelf space. This unit is a convenient tall design, which provides a lot of shelf room without taking up a great deal of floor space. It can be made from 16mrn or 18mm particleboard. If desired you can use particleboard with a bonded veneer finish which requires no further finishing. For best appearance, screws should be countersunk and the tops filled and sanded smooth before painting. Use long thread screws about one

gauge larger than you would normally use for timber. Dip the screws in glue before fastening and avoid over tightening them.

Cutting method.

  • Cut 7 pieces each 225 x 300mm (from one sheet 900 x 300mm particleboard) for shelves and stabilisers.
  • Cut 2 panels, 1500 x 300mm for sides

To assemble.

Using PVA adhesive and long thread particleboard screws, assemble the five shelf pieces between the side panels, leaving 300mm clearance between top and bottom shelves to fit stabilisers. Locate stabilisers (the two remaining 225 x 300mm pieces) in top and bottom openings, about two thirds back from the front edge. Screw and glue stabilisers into position.

Countersink screws, fill and sand smooth, fill edges ready for painting, or apply self-adhesive edging tape to the front edges. If using veneered particle­board, fill screw holes and colour to match surrounding surface.

Materials you’ll need:

  • 2 pieces 1500 x 30Omm particleboard
  • (16 or 18mm) a 2 pieces 900 x 30Omm (16 or 18mm) particleboard
  •  Long thread particle board screws
  • P.V.A. adhesive
  • Sandpaper
  • Suitable filler
  • Edging tape if required

Tools you’ll need:

  • Screwdriver
  • Metric rule
  • Sharp panel saw (10 or 12 teeth per 25mm)

You may also be interested in :

  • Photo: howtoaustralia.com.au

    Fixing A Dripping Tap

  • test map

    test map

  • Indicators on Getting Your Employees Ready For Their Heavy Vehicle Licence You Need To Know

    Indicators on Getting Your Employees Ready For Their Heavy Vehicle Licence You Need To Know

Filed Under: Handyman Sydney

DIY Top Tip – Build Pergolas, Deck, Patio

February 23, 2014 by Billy Soler

DIY Top Tip – Build Pergolas, Deck, Patio
sydney cbd plastering
Photo : pergolaland.com.au

When building Patios, not all paving has to be laid with mortar. A variety of modern paving materials is available for the handyman to lay without special skills or training.

The durability of the finished job depends on the sub base underneath. It should be firm and smooth, (N B. If the finished job is going to be subjected to heavy traffic, the sub-base must consist of concrete bedding and backing).

Any holes or soft areas should be filled with rubble bound with sand and rammed smooth. Soil should be excavated to the desired depth. Plastic sheets placed underneath will prevent weeds growing through. Un joined concrete slab or old roads are also suitable if sound, clean and the right level. As with all building projects, local council regulations should be observed.

Some kinds of edging boards are needed to stop the paving stones moving when walked over.

They are set out 1Omm above the planned finished height to allow for compaction. Then a layer of sand, screened smooth, is laid between the edgings. It should be clean and sharp. Allow for the thickness of the sand layer when working out the level of the paving. The sand should not be walked on after screeding to prevent it compacting unevenly. Only screed a short area of sand at a time.

https://t.co/O3dUvPe9pg Pergolas Sydney Authority
7/40 The Grand Parade Brighton Le Sands NSW 2216
(02) 8080 4340 https://t.co/y438eerhE4

— Pergolas Sydney (@pergolassydney) May 31, 2017

Laying the blocks.

After screening the sand level, place the blocks on the un-compacted sand in the desired pattern. For example, make a herringbone pattern by alternating pairs of vertical and horizontal blocks. If the first course starts with a horizontal pair, start the course underneath with a vertical pair.

The first few rows of blocks must be placed with care to avoid moving the others already laid. Once several rows are in position you can work more quickly and firmly.

Pergolas Sydney Authority 7/40 The Grand Parade Brighton Le Sands NSW 2216 Phone:(02) 80804340 http://www.pergolassydneyauthority.com

A post shared by Pergolas Sydney Authority (@pergolas_sydney_authority) on May 30, 2017 at 7:56pm PDT

Cutting edge pieces.

Once a good sized area has been laid, cut blocks to fit the edges using a block splitter or by sawing. Very small gaps less than 40mm are better filled with a 4,1 mix of sand and cement mortar

Materials you’ll need to build a Pergola or Patio:

  • Paving blocks
  • Clean, sharp sand
  • Wooden edging boards
  • Rubble filling if required

Tools you’ll need:

  • Tape measure
  • Block splitter or saw
  • Yard broom
  • Vibrating compactor (hired)

Our Map Direction
For customers that would like to visit us we offer this convenient Map Directions for you to use.

Pergolas Sydney Authority
7/40 The Grand Parade Brighton-Le-Sands , NSW 2216
Phone:02 8080 4340
Map: https://www.google.com/maps/d/viewer?hl=en&authuser=0&mid=1NJFDiikVPpWGsN8fxtaQwSb3j5Q&ll=-33.95649300000001%2C151.158547&z=11

You may also be interested in :

  • handyman company name ideas

    Fence Installation Expert Advice

  • Advance Through Innovation

    Advance Through Innovation

  • home plumbing system

    What is Plumbing

Filed Under: Handyman Sydney

Fence Installation Expert Advice

February 20, 2014 by Billy Soler

Fence Installation Expert Advice
handyman company name ideas
Photo : fostersfencing.com.au

The most common type of fencing in Australia is timber, with closely spaced palings being among the most popular choices. Many timber species are suitable for fencing including the naturally durable mixed hardwoods, preservative treated radiata pine, Californian redwood and western red cedar. Other species of timber can be used if you plan to paint the fence.

If in doubt as to the kind of timber to use for fencing in your area consult your timber supplier or the timber development association in your area.

All fixings such as nails, screws, hinges etc must be rust-resistant, preferably hot dipped galvanized, stainless steel or copper. Pickets, slats, cappings, mouldings and gate members should be seasoned.

Because of the variety of soil conditions found on different properties, the Timber Development Association of N.S.W recommends that three trial posts be erected and load tested to establish the correct depth in the ground. Usually around 90Omm is suitable for a fence about 1m high- Where posts are erected in soft clay, sand or silty soil, they should be embedded in 150mm of concrete on a layer of gravel for drainage. The concrete should not go underneath the post.

It is also recommended (for timbers other than pressure treated radiata pine) that the part of the post below ground level be given a coating of timber preservative.

Important!
Council regulations vary from area to area so check with your council FIRST about what building materials and heights they prescribe for fences where you live.

Erecting the fence.

No matter what style of fence you choose, the key to durability and proper installation is in the posts. These hints will help you install the posts properly.

1. Mark the position of the postholes. They are usually 2 to 2.5m apart. Align them with a piece of string stretched from the corner posts of existing fences. If there are no existing posts you will have to find out where your property boundary is and begin from there. It is usually marked by white pegs driven into the ground.
2. Dig holes to the required depth. This is easier if done with a post hole digging tool. About a third of the posts total length will be in the ground. For example, a fence 1 m high may have posts set 0.3m deep. A fence 1.8m high may have posts set as much as 0.6m deep.
3. Put a layer of gravel into the bottom of the hole for drainage and to prevent the post wood rotting.
4. First insert the corner post and check that it is level in the hole, using a carpenter’s level or plumb bob, then brace it temporarily in place with timber. Then place other posts in holes checking levels as you go, and lining up with string line.
5. Mix enough concrete at a time for one post. Pack this into the hole around the post, working well to eliminate air bubbles. Fill the hole to just above ground level and slope the concrete away from the post for drainage.
6. When all the vertical posts are in place, let the concrete cure for up to 6 days before finishing the fence. The palings can then be set close together or with a slight gap between the boards, left plain at the top or capped with a horizontal bar of timber. As an interesting change, the boards may be nailed on horizontally with the palings nailed to vertical battens fixed to the posts.

Finishing.

The fence may be painted or stained using an oil or water based stain designed for fences. Depending on the style of fencing and the type of timber used, you may decide to obscure the grain with an opaque finish or to enhance it with a stain which emphasises the grain of the timber.

Materials you’ll need:

  • Fence posts and palings
  • Timber preservative
  • Gravel
  • Cement
  • Galvanised or rust resistant nails
  • Timber for bracing
  • Fence paint or stain

Tools you’ll need:

  • Post hole digger
  • Carpenters level or plumb bob

You may also be interested in :

  • Indicators on Getting Your Employees Ready For Their Heavy Vehicle Licence You Need To Know

    Indicators on Getting Your Employees Ready For Their Heavy Vehicle Licence You Need To Know

  • We Deliver High-Quality

    We Deliver High-Quality

  • property maintenance sutherland

    Build Shelves at Home, Easy Steps

Filed Under: Handyman Sydney Tagged With: Fence Builders

Start Your Own Compost Bin

February 16, 2014 by Billy Soler

Start Your Own Compost Bin
home renovation
Photo: birdsandblooms.com

Starting your own compost heap uses up very little space or time and reward you with ample hygienic, useful humus to nourish your garden or vegetable plot. The heap can be set up in any out-of-the-way corner.

A bin is neater than an open heap and there are a number of commercially-made bins you can buy in sizes to suit your garden.

The main requirements are:

  • It must keep the compost ingredients together. Ideally without seepage of odors or liquid.
  • It must allow ventilation.
  • It should harmonize with the garden.

Nearly all garden and household waste is suitable such as vacuum cleaner contents, rags, tea leaves, food scraps, fat and vegetable wastes and all normal garden refuse such as grass cuttings, leaves, wood, straw and organic waste. As one maker of compost bins expresses it “what you don’t eat feeds what you eat”.

Ideally you need a mixture of matter that decomposes rapidly blended with slower to decompose materials. If using grass clippings only, the pile would have to be turned every 2 or 3 days with a fork and watered after each turning so the anaerobic bacteria have a chance to work. Instead of turning, you can mix different layers of materials such as clippings, leaves, food waste, etc, to ensure good aeration throughout the heap.

To make the compost bin.

  • Site the bin in a convenient, reasonably sunny location.
  • Fork the ground underneath the bin for easy entry of earthworms and soil organisms.
  • Pack in the first layer of about 20 mm of organic matter.
  • Sprinkle each layer with a handful of lime or dolomite to reduce acidity, then blood and bone to activate conversion. Cover with about 25 mm of soil.
  • Repeat until bin is full. It will reduce in volume gradually as it changes into compost so continue adding material to top it up until the bin is full of compost. When the bin is full, leave 10 to 12 weeks to mature. If too dry at times, sprinkle with water to dampen.

When the compost resembles peat moss, it is ready to mix in with the topsoil of your garden.

Note: do not place materials such as glass or plastic, coal or ashes in your bin.

Diseased plants or perennial weeds should be burnt.
Materials you’ll need:

  • Compost bin
  • Assorted organic waste material
  • Soil
  • Lime or dolomite
  • Blood and bone

Tools you’ll need:

  • Spade Garden fork
  • Hose or watering can

You may also be interested in :

  • handyman company name ideas

    Fence Installation Expert Advice

  • Necessary Licences And Insurances for Concrete Services Near Me

    Necessary Licences And Insurances for Concrete Services Near Me

  • We Deliver High-Quality

    We Deliver High-Quality

Filed Under: Handyman Sydney Tagged With: Backyard

Lawn Maintenance and Garden Structures Tips

February 12, 2014 by Billy Soler

Lawn Maintenance and Garden Structures Tips

The garden shed has certainly come a long way. From being only a storage centre, and not a very glamorous one at that, a new breed has emerged. These good-looking steel or aluminium buildings are suitable for pool storage and as dressing sheds; for hobby workshops, and secure storage for all the accessories related to home and garden care.

handyman services list
Photo : opengarden.org.au

First, decide what purpose you have in mind for the building. This will help decide the size you need and the type of building. For example, a storage shed could do without windows, which are usually an optional extra. You may not even feel a proper floor is necessary, although it is probably a good idea. However, if the building is to be your workshop then you should look at the accessories available such as pre-painted steel floors, adjustable shelving and hopper windows. The keen gardener has, if anything, even more choice available. Greenhouse conditions can be created on whatever scale you require. The simplest may be a frame covered in shade cloth purchased by the metre. Elaborate hothouses can also be bought in kit form, usually comprising a quick-assembly frame and cover, which drapes and fastens over the frame. Whatever your choice of building, council permission should be obtained to erect it. Many councils have regulations regarding permissible height, positioning and even building materials which may be used in their municipality.

Points to keep in mind when deciding on a suitable garden structure are:

1. Location of the building. It should not be in an unsightly position, but should still have easy access both for yourself and for getting contents in and out. 2. Drainage – the building should not be in a depression where run-off from the house or pool can flood or float it. If possible, site the building on a slight rise. 3. Make sure the building will be large and roomy enough to fulfil its desired function. There is little use selecting a workshop then finding when you and the workbench are inside, one of you has to leave!

You may also be interested in :

  • Photo: howtoaustralia.com.au

    Fixing A Dripping Tap

  • We Deliver High-Quality

    We Deliver High-Quality

  • home renovation

    Start Your Own Compost Bin

Filed Under: Handyman Sydney Tagged With: Backyard

  • « Previous Page
  • 1
  • 2
  • 3
  • 4
  • 5
  • 6
  • Next Page »

Our Preferred Partners For Drafting Services in Sydney

House Plan Design & Drafting Services
24 Pines Parade, Gymea NSW 2227
Facebook
Google+

For Decking Builders in Sydney, We Use The Pergolas Sydney Authority Services

Sydney Timber Decking Specialists
7/40 The Grand Parade
Brighton Le Sands , NSW 2216
Phone: (02) 8080 4340
Facebook
Google+ MAP

Our Partners For Driving School in Campbelltown

Sydney South Driving School
Phone 0409129275
10 Salerno Pl, Blairmount , NSW 2559
Facebook
Youtube
Liverpool Driving School
Unit 22, 32 Castlereagh St, Liverpool, NSW, 2170
Phone: 0282779091

Copyright © 2025 · Lifestyle Pro Theme on Genesis Framework · WordPress · Log in